Backing up mailboxes in Exchange Online as a part of the Office 365 or Microsoft 365 suite is always a debated topic – some will argue that Microsoft have enough redundancy and backups in their own environments so you don’t need a third party solution and you’ll always be able to get your data back. However, this hasn’t been proven yet (thankfully) in a real world event where mailbox data has been lost by Microsoft. It also doesn’t cover scenarios where there’s outages, account problems or other connectivity problems that can delay your access to your cloud based data. Is it a risk each company will need to decide if it’s worth an investment into reducing.
Altaro asked me to have a look at their product – Altaro Office 365 Backup – to provide a quick run-through on setting it up and seeing what it does. Their solution is fully cloud based, so you don’t need any extra hardware to get going. You can set up a 30 day free trial here. Once signed up, here’s what to do:
After logging in from the link you’ll be emailed, you’ll be presented with this screen:
The wizard here will take you through the setup required, starting with a Company Name and your domain configured in Office 365 (which you can get from https://admin.microsoft.com/Adminportal/Home#/Domains) – I had to use my primary:
Next, you’ll need to grant access for Altaro to be able to access data in your tenant, which makes sense since you want them to back it up:
Following the links you’ll get the standard window advising you what permissions you’re granting and to whom:
If it worked, a successful message will show and you can go back to the setup wizard:
After doing this three times, you can go to the next step where you can choose which users to back up – which as it says, will be this data: “Office 365 User Backups consist of Emails, Calendars & Contacts within Mailboxes and Files stored within OneDrive accounts.”, then “SharePoint Backups consist of Files stored within SharePoint Document Libraries.”
If it all goes well, you’ll then get to the final screen showing a successful setup:
That’s it – backup has been set up. Of course your data won’t be in there instantly, the first backup happens over 24 hours, and then up to 4 times a day ongoing. You can choose if new users are automatically added to backup plans or not, which should turn this into a set and forget backup system.
Set and forget only works if you’re alerted around issues, which is possible in the Alert Settings – you can choose what sort of alerts you receive, such as if a backup job failed:
Restoring is also an easy process – for example if you want to restore an entire mailbox, the Mailbox Restore wizard will take you through the steps and ask where you want to restore – onto that user’s mailbox, another user’s mailbox, an Outlook PST file, or a ZIP file containing each mail item as an individual file:
You can also use the Granular Restore option, to search and restore particular items rather than entire mailboxes and accounts. The granular restore has the same options as the full restore for destinations, so there’s a lot of flexibility based on what you’re after:
If you can’t find what you’re looking for, the ‘Advanced Search’ option lets you define what you’re looking for:
Pricing for Office 365 Backup by Altaro is available at https://www.altaro.com/office-365-backup/#faqs and is a per user, per type (either mailbox or mailbox + OneDrive + SharePoint) model. This also includes 24/7 support and unlimited storage for backups.
After setting this up and trying out all the options, I’m confident in saying this is as good as you could hope for, from a turn-key solution. Setup is literally a few minutes, there’s no software to install anywhere and no infrastructure requirements. The data Altaro backs up is held forever (yes, infinite retention!) assuming you still have a valid subscription. The data is stored in Microsoft Azure, but only in West Europe at the time of writing – so if you have data sovereignty requirements, you’ll need to assess this.
Two new little features have turned up for Safe Links as part of the Microsoft 365 Security & Compliance suite.
Display the organization branding on notification and warning pages
The first option is to show your organization’s branding on warning pages. This should help users identify that it’s a legitimate warning they’re seeing, as default Microsoft warning pages are often used by malicious actors to look legitimate themselves.
Use custom notification text
This lets you put a message that sounds like it’s actually from your own company when a webpage gets blocked. This means you can put in contact details or a process you want users to follow when they hit a site – which could be sending an email or calling helpdesk.
Here’s how the custom text and logo looks on a blocked page:
The custom branding will appear above this warning as a banner and a small logo for your company.
If you haven’t set up branding already, have a read on Microsoft Docs on how to do it for Azure AD and Microsoft 365 (do both!).
Microsoft by default, are enabling a bunch of shopping options in Edge. As per the article above, there’ll be coupons that’ll pop up, detections when there might be the same item you’re looking at cheaper elsewhere, and tab page enhancements to add extra shopping info about items.
I can already hear some of you saying you don’t want this in your place of business, so to disable it you’ll need to find the ‘Shopping in Microsoft Edge Enabled‘ GPO, located under User Configuration > Policies > Administrative Templates > Microsoft Edge default settings (users can override) / Microsoft Edge:
If you’re missing this setting, make sure you update your ADMX files by downloading from here and updating your central repository.
It’s good that this is under both force disable, as well as disable but let a user turn it on if they want. It’s not good that it’s on by default.
Friendly URLs
If you’re on Edge, you may have noticed this already. Copying a URL link from Edge, then pasting it somewhere that supports HTML code results in this:
It’s another ‘on by default’ and although I can see certain use cases where this would be preferable, I’m fairly against changing the default copy/paste behavior that has been in place for decades.
If you copy a link and want to paste it as the link itself, you can use Ctrl + Shift + V instead of Ctrl + V … except right now, this doesn’t work in Office apps like Outlook or Word, and I’ve tested in both 2016 and 365.
Edge itself also has a new right click menu for pasting showing the options, but right click > mouse to menu, mouse to submenu, choose ‘Plain text’ is a bit clunky.
You can turn this off in the Edge settings, but again businesses and enterprises may not want this new feature in place, since some would more frequently be copying a link because they want the link itself, rather than a nice way to share it.
Again, Group Policy has a setting for this but this time it’s just a forced setting, rather than user changeable. If you want that, you’d need to deploy the registry setting as per the above article with a ‘apply once and don’t reapply’ option ticked.
The GPO is under User Configuration > Policies > Administrative Templates > Microsoft Edge > Configure the default paste format of URLs copied from Microsoft Edge, and determine if additional formats will be available to users
That’s a doozy of a name, and a doozy of a long dropdown menu with a ‘coming soon’ dropdown – none of these dropdowns actually match the description given.
I am a big fan of Edge, but it’s pretty obvious that the normal care that goes into updates just hasn’t happened in this instance. There’s already a fair bit of noise about this change, so who knows, maybe they’ll at least change the default behavior and not have it on?
My Feed
This one actually sounds really useful and lets both users and admins modify and present different sets of data arounds news and the organisation.
It has to be enabled in the Microsoft 365 admin center, which it was already on for me:
But, I’m missing some of the options selected in my Australian tenant. I checked my U.S. tenant and I see different things:
I’m not actually seeing the My Feed in my Australian tenant’s accounts, so I’d be guessing it’s either a US only thing at this stage, or it’s still rolling out. A bit annoying that this isn’t mentioned in the ‘My Feed‘ article or the original article mentioning the features that are now out, so hopefully the rest of us get it soon!
Previously I’d already covered Synology’s Microsoft 365 Backup software which I was a big fan of, for simplicity of use and an incredibly cheap price point for a small to medium business as a Microsoft 365 data backup solution.
The support goes a long way back years wise, which is great to see. They have a comprehensive overview of this application and it’s abilities, but I’ll cover it all more briefly here while sharing my experience setting each type of backup up.
Installing the software on a Synology DiskStation is easily done via Package Center and a very quick activation process that requires a free Synology account:
After activating, you’ll immediately see the overview screen. At a glance, it gives a good idea on the sorts of things you can back up:
PC and Physical Server backups
Backing up a physical PC or Server is pretty easy, and the wizard takes you through the steps. Windows 7 SP1 and above is supported, as is Windows Server 2008 R2 and above, and needs the ‘Synology Active Backup for Business Agent’ installed. After a next, next finish, install, you’ll need to specify the IP/name of your DiskStation, and username/password:
After connecting and confirming the details, the PC is registered against Active Backup for Business, and the agent continues to run in the tray:
The agent will show when you last backed up, and if a backup is currently running:
No backups will run yet though, because we need to create a backup task back on Active Backup for Business. Again, a wizard will take you through this and let you choose what options you’d like for backup. I’m going to just back up everything, with the data compression and encryption options (which are default)
You then define when you want your backup to run – manually, or on a schedule:
I do quite like some of the options here – backup by event of screen locked or signing out is a nice way of making sure it doesn’t interrupt someone using the PC and slow things down while they’re actually working. Also having backup windows, so you can block out the working day if needed.
Next is the retention policy, a good way of reducing space taken – is there a difference between a backup 5 months ago vs 5 months and 1 day? Probably not, and very unlikely that you had something worth restoring on your PC only for 1 day.
At the end of the wizard and a summary screen, you have the option to back up now. I kicked this off, and the agent immediately showed the progress and events related to backing up.
This was a really easy and painless setup to back up a PC, but what about restoring? You can either create recovery media for a full restore, or you can use the Restore Portal to navigate through backups and pick what you’d like to restore:
The bottom time line lets you pick from what point in time you’d like to restore, with a dot showing each available time point.
Then, you can navigate through the disk you need, and go through the folders which match the file structure at the time of backup. Once you’re on the single file, multiple files or folder you want to restore, you can choose the “Restore” option to put the files back in their original location, or somewhere else, and decide if you want to automatically overwrite existing files or not.
Download however, will just download the file you selected like any other browser based download, or multiple files will come through as a single ZIP file.
File Server Backups
If you don’t want, or can’t have an agent on a file share, you can instead remotely back up via SMB or rsync:
After entering the remote server details:
It will verify they work, then let you set up a task:
The options are Multi-versioned, Mirroring and Incremental. They cover the different scenarios you might want to use – Multi-versions will take up the most space, where mirroring can only ever be as big as the source files, and incremental is half way between the two, without the versioning component:
You can then choose what to back up in the file share:
And then finish creating your task by giving it a name, telling where to backup the files to locally, and set a schedule.
The restore process is pretty much the same as PC / Physical Server, so I won’t go into detail on that part.
Virtual Machine
Both VMWare Hypervisor and Microsoft Hyper-V are supported Virtual Machine platforms. As I haven’t touched VMware for years, we’ll look at Hyper-V only. It’s worth noting that cross platform restores are supported – you can restore a Hyper-V VM to VMware vSphere too.
Creating a Hyper-V backup is again an easy process:
First, you’ll need to put in the Hyper-V Host details. If you’re trying to back up VMs on a Windows 10 laptop you have, there’s a few small requirements:
Set up WinRM by running ‘WinRM QuickConfig’ in an elevated command prompt. You’ll need to make sure none of your network connections are set to ‘Public’.
The Hyper-V Backup Task wizard will give you hints as to where you might be stuck, and at the end you’ll have your host listed:
The Hyper-V Virtual Machines will then be automatically detected and listed, but they’re not configured for backup yet – we need another task. Clicking ‘Create Task’ will start by asking you where you want your backups:
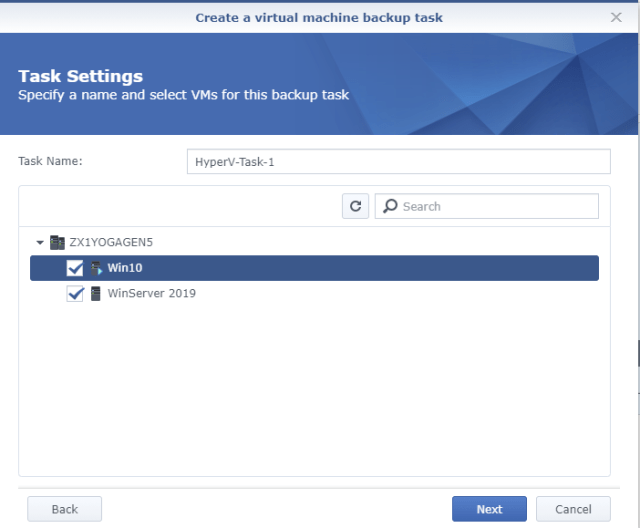
Then you can choose the Hyper-V VMs to back up:
One selecting, we have several settings we can configure:
The default options are shown.
Maximum quantity of concurrent backup device(s) can be up to 10.
Enable Changed Block Tracking – Only transfer blocks that have changed since the last backup, rather than all blocks to reduce backup times drastically.
Enable application-aware backup – Use Volume Shadow Copy to ensure consistency with backups
Enable data transfer compression – Suggested for slow networks to improve transfer rates
Enable data transfer encryption – Self explanatory :)
Enable source datastore usage detection – to prevent running out of space
Enable backup verification – Checks the backup when complete
Once you’ve selected the options you want, you’ll see the familiar Schedule Backup Task window, retention policies etc:
I always prefer an agentless backup where possible, so it was good to see no agent was required to backup Hyper-V VMs.
Backing up a Windows Server 2019 VM was rather quick – especially since the laptop hosting the VM was connected via Wifi.
Restoring is again pretty simple, you can navigate to the location of the backups and see a copy of the vhdx for each VM, with other files I expect keep other incremental change data:
The Restore Wizard starts by letting you pick witch platform you’re restoring to- Synolgoy Virtual Machine Manager gives extended options for management and recovery and is recommended for flexibility in production environments. For a lab, you should be able to get away without it:
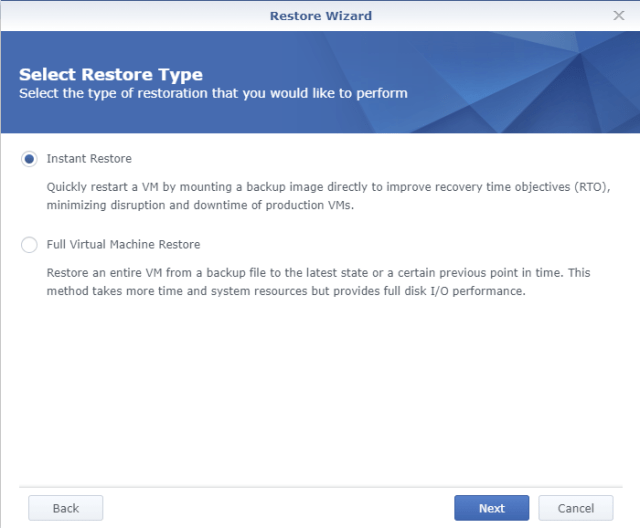
Restore Type – Instant Restore and Full Virtual Machine Restore are the two choices:
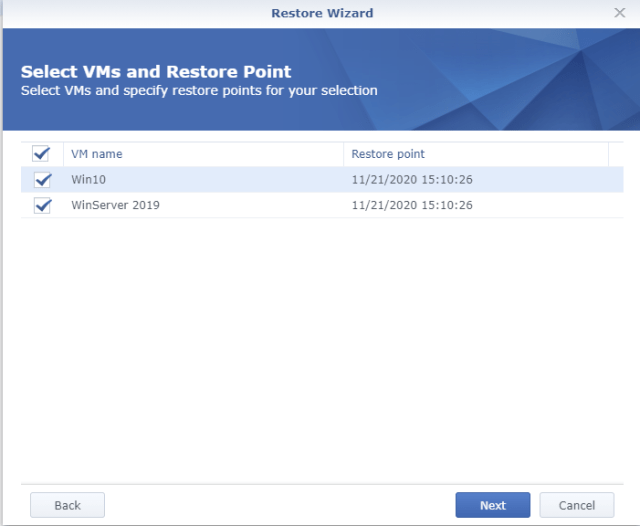
You can then pick which VMs you want to restore and which restore points:
Restore Mode lets you choose if you’re replacing the current live VM, or restoring to a different location as a copy:
Finally, the summary screen with the option of automatically powering on the VM when complete.
Phew! That’s the runthrough of the backup types and restore options Active Backup for Business supports.
The dashboard gives a great ‘at a glance’ overview of everything going on, and we even have de-duplication of data! This is what it looks like with some real data in it, compared to the first screenshot of this post:
There’s a bunch of other first party Synology apps available too:
Plus third party apps:
And with solutions like Docker, you can use your Synolgoy to host many other solutions available in containers, and run them off this little black box.
I’ll say the same thing about Synology Active Backup for Business I did in my Synology Microsoft 365 Backup Review – this is pretty impressive for ‘free’. Yes, you have to buy the Synology DiskStation itself, and you’ll need disks, but that’s it. Even if you use it as a single nightly backup for having a local and quickly accessible restore point to provide as much business continuity as possible, it’s an entire solution at an incredibly cheap price point.
Because you can do both Microsoft 365 data AND Hyper-V VMs on this single device, it should be an option that any small to medium business should investigate. The interface is easy to use, the logs show detailed information about what’s going on – and even for a home business setup, it’s very much a set and forget event.
Earlier this year, Microsoft changed how voicemail worked for Skype for Business on-premises customers. There was little difference to end users when Unified Messaging changed to Cloud Voicemail, but it did break a few Auto Attendant options for those not in the cloud.
At the time I remember it being rather difficult to find out information on, and the good contacts I had at vendors also struggled to gather intel on how the change would go.
In the end, the migration happened and it was thankfully a non-event. What I didn’t realise at the time, was that it introduced a new portal for Voicemail settings at https://admin1.online.lync.com/lscp/usp/voicemail (which has slight variations where you are in the world, for Australia it’s https://admin1au.online.lync.com/lscp/usp/voicemail – but the links seem to redirect to where they need to go) and there’s a few interesting settings:
The Call Answer Rules section (Choose how you want your calls to be handled when they reach the voicemail service) lets you pick what happens when someone hears your voicemail, including the last option ‘Play greeting, then allow the caller to recording a message or transfer to the target user’. If you set this, you can then enter the number you want calls to go to if someone does press ‘0’ – such as Reception, or your mobile phone. The default setting is ‘Play greeting, then allow the caller to record a message’.
The Prompt Language section (Changing this setting will change the greeting prompt language) will change the language and accent of the greeting – so if you’d like them to sound Australian, you can choose that.
The Configure Out of Office greeting section (Customize an Out of Office greeting message, and choose to play it to callers all the time, based on your Outlook auto-reply status, or calendar OOF status) was the one I liked the most. It can sync with your mailbox to know when you’re Out of Office via your current Outlook status (either with an autoreply, or just in a meeting with the status ‘Out of Office’), and when true, give a different message to the caller saying you’re out of the office.
There’s also another option Text-to-Speech Customized Greeting Option (Customize your Text-to-speech greeting message) that lets you customise the generic Out of Office greeting to whatever you like. Although you can only type your greeting message, the text-to-speech works really well and sounds natural.
To me, this is great. I can set a generic ‘I’m out of the office, please call X on this number’ which only plays when I’m actually out of the office. If I’m not, then a caller will hear my standard greeting and can leave a message, instead of hassling co-workers. I don’t have to remember to set it or change it, it just applies if I do the right thing in my Outlook calendar.
If you’ve got Cloud Voicemail; which you should if you’re on Skype for Business, Skype for Business Online, or Microsoft Teams as your phone system, check it out and save yourself some time from changing your voicemail when you go on leave, or just have a meeting when you’re not around.