Update 20th November 2023 Bing Chat for Enterprise has been renamed to ‘Copilot with commercial data protection‘ – General Availability 1st December 2023.
Original Post Q&A Assist is a new feature Microsoft have launched on the Q&A ‘Ask a question‘ page, where you would normally pose a question to post in the forums and have another human answer for you. Now, backed by the Azure OpenAI Service, you can get AI based answers using data that Microsoft curates.
This is a bit different to Bing Chat (or Bing Chat for Enterprise) where it’s using knowledge from all over the internet, and as per any OpenAI setup, should be tailored a bit more to the sort of questions it expects.
Q&A Assist at the time of posting is in ‘Public Preview’:
I thought it would be worth comparing the two to see how they fare, but it took me down a bit of a different path than I expected.
The Example
Q&A Assist gave a fairly reasonable broad response and expected you to dig more into it only via official learn.microsoft.com content.
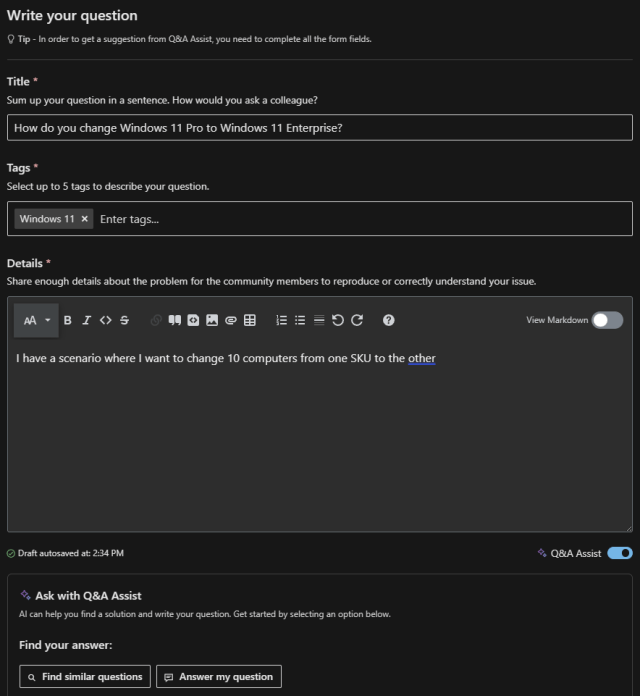
Bing Chat however, took me down a bit of an interesting path. It gave a step by step:
But that didn’t scale or have the automation of the above answer, so I tried to clarify:
Not too bad, but not the same answer as Q&A Answers – both valid depending how you buy your Windows 11 Enterprise licenses though. What if I limit Bing Chat to only use learn.microsoft.com content?
Proof that AI doesn’t do everything for you – OK I ask the same question piecing all the bits together:
The same answer as before but only from learn.microsoft.com? This gets stranger when I check reference 1, which is actually a Q&A page with the quesiton “Which Windows 11 version allows multiple remote desktop sessions” and doesn’t have anything about VAMT at all. Reference 2 which strangely tells me to do what I’ve already done on this query, links to another Q&A page which is on topic, but has no content that would have been helpful for this answer. Something wacky going on with those reference links, but I suspect it actually used the information in the same session and then limited the claims on where it could verify those answers to learn.microsoft.com only, which if you only saw this single answer woudn’t be right.
Is Bing Chat for Enterprise Different?
I pumped the same final all-encompassing question in, and received probably the best answer out of everything, great sources and almost only limited to learn.microsoft.com – a Youtube link turned up, but that was from one of the Q&A pages.
Giving Bing Chat another chance, I started a new session and asked the same question again:
Different again, but you can see Bing Chat gives more ‘consumery’ answers while Bing Chat for Enterprise didn’t – I was surprised by this but it does make contextual sense. The references also make sense this time, so this leans towards my theory on using previous answer information in the same question thread – something to be aware of.
Coming back from that tangent, what does this all mean for Q&A Assist? It’s good that it helps define a question and ask in both summary and detailed, needing a category and limiting answers only to trusted sources. You can see the design of it is to hopefully provide a quick answer before someone posts the forum question, or at least supplement their question with extra details on what they might be trying to ask.
Moreso, it’s a good example of what is fairly easy to achieve with Azure OpenAI pointed at a set of data – which could purely be a website. It takes a chatbot to the next level by not needing anyone to give it a set of questions and answers, it’ll work all that out itself. It’s also worth nothing that even in the Microsoft ecosystem there are multiple AI chatbot solutions, such as Power Pages also being able to point a chatbot to a page to do Q&A type work.
The hard habit to break for many people will be years of using a search engine to look up an answer and doing your own work going through it – any AI driven chat system should make this easier and more effiencent to look up detailed questions and follow the sources to get your truth, but it’s something that we’ll all need to get used to while becoming more ingrained with everything we do online.
Previously I’d already covered Synology’s Microsoft 365 Backup software which I was a big fan of, for simplicity of use and an incredibly cheap price point for a small to medium business as a Microsoft 365 data backup solution.
The support goes a long way back years wise, which is great to see. They have a comprehensive overview of this application and it’s abilities, but I’ll cover it all more briefly here while sharing my experience setting each type of backup up.
Installing the software on a Synology DiskStation is easily done via Package Center and a very quick activation process that requires a free Synology account:
After activating, you’ll immediately see the overview screen. At a glance, it gives a good idea on the sorts of things you can back up:
PC and Physical Server backups
Backing up a physical PC or Server is pretty easy, and the wizard takes you through the steps. Windows 7 SP1 and above is supported, as is Windows Server 2008 R2 and above, and needs the ‘Synology Active Backup for Business Agent’ installed. After a next, next finish, install, you’ll need to specify the IP/name of your DiskStation, and username/password:
After connecting and confirming the details, the PC is registered against Active Backup for Business, and the agent continues to run in the tray:
The agent will show when you last backed up, and if a backup is currently running:
No backups will run yet though, because we need to create a backup task back on Active Backup for Business. Again, a wizard will take you through this and let you choose what options you’d like for backup. I’m going to just back up everything, with the data compression and encryption options (which are default)
You then define when you want your backup to run – manually, or on a schedule:
I do quite like some of the options here – backup by event of screen locked or signing out is a nice way of making sure it doesn’t interrupt someone using the PC and slow things down while they’re actually working. Also having backup windows, so you can block out the working day if needed.
Next is the retention policy, a good way of reducing space taken – is there a difference between a backup 5 months ago vs 5 months and 1 day? Probably not, and very unlikely that you had something worth restoring on your PC only for 1 day.
At the end of the wizard and a summary screen, you have the option to back up now. I kicked this off, and the agent immediately showed the progress and events related to backing up.
This was a really easy and painless setup to back up a PC, but what about restoring? You can either create recovery media for a full restore, or you can use the Restore Portal to navigate through backups and pick what you’d like to restore:
The bottom time line lets you pick from what point in time you’d like to restore, with a dot showing each available time point.
Then, you can navigate through the disk you need, and go through the folders which match the file structure at the time of backup. Once you’re on the single file, multiple files or folder you want to restore, you can choose the “Restore” option to put the files back in their original location, or somewhere else, and decide if you want to automatically overwrite existing files or not.
Download however, will just download the file you selected like any other browser based download, or multiple files will come through as a single ZIP file.
File Server Backups
If you don’t want, or can’t have an agent on a file share, you can instead remotely back up via SMB or rsync:
After entering the remote server details:
It will verify they work, then let you set up a task:
The options are Multi-versioned, Mirroring and Incremental. They cover the different scenarios you might want to use – Multi-versions will take up the most space, where mirroring can only ever be as big as the source files, and incremental is half way between the two, without the versioning component:
You can then choose what to back up in the file share:
And then finish creating your task by giving it a name, telling where to backup the files to locally, and set a schedule.
The restore process is pretty much the same as PC / Physical Server, so I won’t go into detail on that part.
Virtual Machine
Both VMWare Hypervisor and Microsoft Hyper-V are supported Virtual Machine platforms. As I haven’t touched VMware for years, we’ll look at Hyper-V only. It’s worth noting that cross platform restores are supported – you can restore a Hyper-V VM to VMware vSphere too.
Creating a Hyper-V backup is again an easy process:
First, you’ll need to put in the Hyper-V Host details. If you’re trying to back up VMs on a Windows 10 laptop you have, there’s a few small requirements:
Set up WinRM by running ‘WinRM QuickConfig’ in an elevated command prompt. You’ll need to make sure none of your network connections are set to ‘Public’.
The Hyper-V Backup Task wizard will give you hints as to where you might be stuck, and at the end you’ll have your host listed:
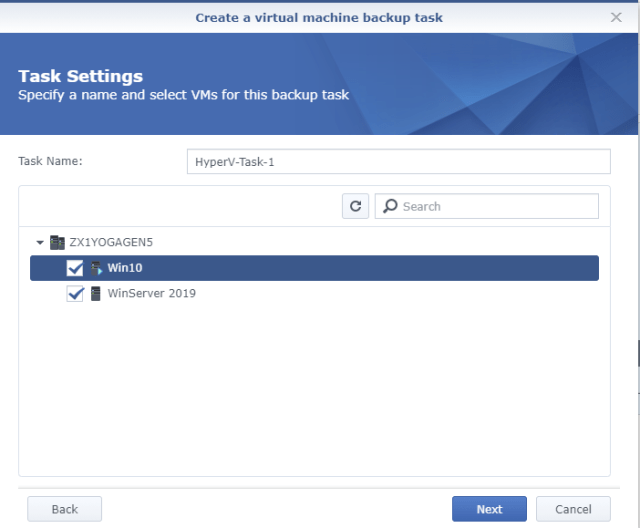
The Hyper-V Virtual Machines will then be automatically detected and listed, but they’re not configured for backup yet – we need another task. Clicking ‘Create Task’ will start by asking you where you want your backups:
Then you can choose the Hyper-V VMs to back up:
One selecting, we have several settings we can configure:
The default options are shown.
Maximum quantity of concurrent backup device(s) can be up to 10.
Enable Changed Block Tracking – Only transfer blocks that have changed since the last backup, rather than all blocks to reduce backup times drastically.
Enable application-aware backup – Use Volume Shadow Copy to ensure consistency with backups
Enable data transfer compression – Suggested for slow networks to improve transfer rates
Enable data transfer encryption – Self explanatory :)
Enable source datastore usage detection – to prevent running out of space
Enable backup verification – Checks the backup when complete
Once you’ve selected the options you want, you’ll see the familiar Schedule Backup Task window, retention policies etc:
I always prefer an agentless backup where possible, so it was good to see no agent was required to backup Hyper-V VMs.
Backing up a Windows Server 2019 VM was rather quick – especially since the laptop hosting the VM was connected via Wifi.
Restoring is again pretty simple, you can navigate to the location of the backups and see a copy of the vhdx for each VM, with other files I expect keep other incremental change data:
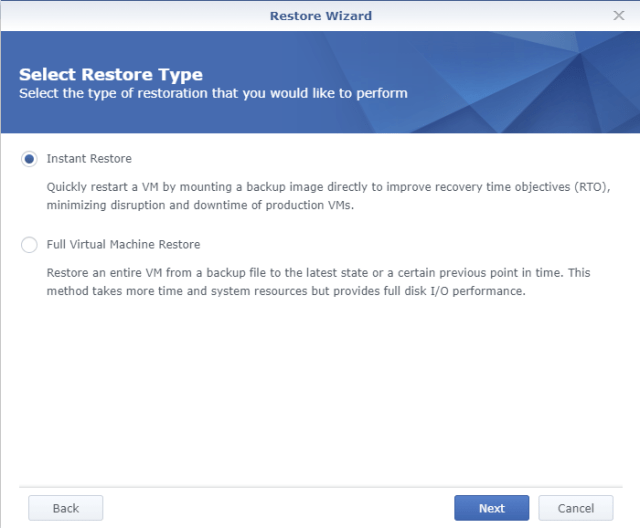
The Restore Wizard starts by letting you pick witch platform you’re restoring to- Synolgoy Virtual Machine Manager gives extended options for management and recovery and is recommended for flexibility in production environments. For a lab, you should be able to get away without it:
Restore Type – Instant Restore and Full Virtual Machine Restore are the two choices:
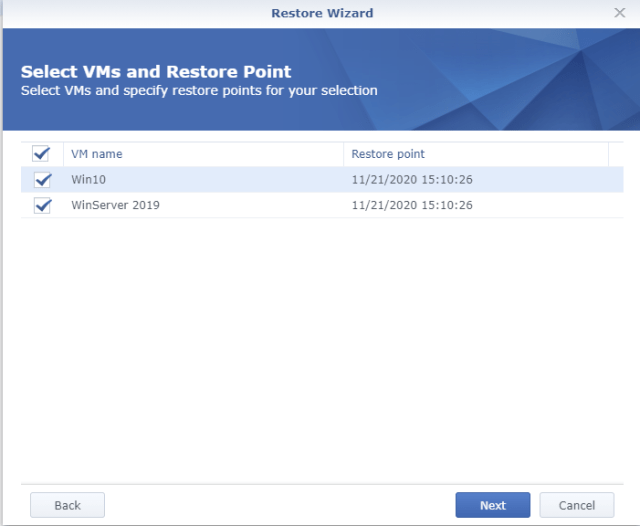
You can then pick which VMs you want to restore and which restore points:
Restore Mode lets you choose if you’re replacing the current live VM, or restoring to a different location as a copy:
Finally, the summary screen with the option of automatically powering on the VM when complete.
Phew! That’s the runthrough of the backup types and restore options Active Backup for Business supports.
The dashboard gives a great ‘at a glance’ overview of everything going on, and we even have de-duplication of data! This is what it looks like with some real data in it, compared to the first screenshot of this post:
There’s a bunch of other first party Synology apps available too:
Plus third party apps:
And with solutions like Docker, you can use your Synolgoy to host many other solutions available in containers, and run them off this little black box.
I’ll say the same thing about Synology Active Backup for Business I did in my Synology Microsoft 365 Backup Review – this is pretty impressive for ‘free’. Yes, you have to buy the Synology DiskStation itself, and you’ll need disks, but that’s it. Even if you use it as a single nightly backup for having a local and quickly accessible restore point to provide as much business continuity as possible, it’s an entire solution at an incredibly cheap price point.
Because you can do both Microsoft 365 data AND Hyper-V VMs on this single device, it should be an option that any small to medium business should investigate. The interface is easy to use, the logs show detailed information about what’s going on – and even for a home business setup, it’s very much a set and forget event.
Update 27th November 2023: The below information may be a bit dated now, so please refer to the lastest official guide here: https://learn.microsoft.com/en-us/entra/identity/authentication/howto-password-ban-bad-on-premises-deploy
Original Post: Microsoft have a nice way of preventing the use of bad passwords. Yes, all passwords are bad, but some are worse than others :)
Azure Active Directory Password Protection is a service that looks at password changes and blocks passwords it deems as weak. This could be from checking it’s an easy password to break using a dictionary attack, or other easily guessable variants. It leverages Microsoft online services to do so, which requires some setup and agents installed on the on-premises environment.
Microsoft’s documentation for this is detailed and fairly easy to follow, but I thought I’d do a quick rundown.
Installing the agents:
There are two agents – the ‘Azure AD Password Protection DC agent’ and the ‘Azure AD Password Protection proxy service’. Both can be downloaded here.
The ‘Azure AD Password Protection DC agent’ needs to be installed on all Domain Controllers (DCs), but the ‘Azure AD Password Protection proxy service’ only needs to be installed somewhere once. You CAN install it on a Domain Controller, and you can install it on ALL Domain Controllers, but Microsoft highlighted this as a potential security risk allowing any DC internet access. At least two installs of this is recommended for redundancy.
The ‘Azure AD Password Protection proxy service’ can’t be installed alongside (on the same server) as ‘Azure AD App Proxy Service’ – which is probably the same utility server you’d think of putting this on.
After installing the ‘Azure AD Password Protection proxy service’ you’ll need to run a few PowerShell commands to register it with global admin rights – you don’t need to create a service account for this, it’s just a one time registration process.
The commands are:
Register-AzureADPasswordProtectionProxy -AccountUpn ‘[email protected]’ (run this on each install)
Register-AzureADPasswordProtectionForest -AccountUpn ‘[email protected]’ (run this after the first install only)
Installing the ‘Azure AD Password Protection DC agent’ is easier again, but will need a reboot of the DC to start working.
Both clients automatically update themselves.
Configuring in Azure Active Directory
You’ll need to enable on-premises Azure Active Directory Password Protection on the Azure AD portal – that link should take you right to ‘Password Protection’ but it’s located under Azure Active Directory > Security > Authentication methods > Password protection.
Start with ‘Audit mode’ rather than ‘Enforced Mode’ so you can get an idea of how many users might get affected by this change, and allow you to communicate this out before forcing.
You can also add custom banned passwords which might include your company name and common terms in your business and industry, to ensure easily guessed passwords aren’t used.
Once set up, you can either read through the logs on a DC, or run this PowerShell command on each DC to see the results.:
Get-AzureADPasswordProtectionSummaryReport
You’ll need to either wait for users to change their passwords, or do some yourself and work out which DC the changes were done against. These stats will give you an idea of how many ‘failures’ were audited, so you can decide how much of a user impact enforcing the policy will be.
You could of course ship these event viewer logs to a central repository, but the service should just do it’s thing and just block users from setting a new password that’s really bad.
Something I stumbled across today – it appears that Microsoft has decided to abandon Baseline Protection Policies, and replace them with a single ‘on/off’ switch called ‘Security Defaults’
Baseline Protection policies (also called Baseline Policies, it seems both terms have been used) were in preview, and were a pre-canned set of policies based on Microsoft recommendations on standard security settings that should be in place – such as forcing any administrator account to use MFA at each sign in, and blocking legacy authentication.
Here’s what the Conditional Access page currently shows. There might be something wrong with the detection though, as I clearly have a Baseline Policy enabled:
It’s not difficult to recreate the Baseline policies, so I’d suggest migrating off of them now while they’re still functional – you don’t want to be left in a state where you didn’t realise MFA for admins was now not being forced.
The replacement Security Defaults option can be found by going to Azure Active Directory > Manage – Properties > Manage Security Defaults (it’s not in the Conditional Access area):
Before flipping this switch to ‘On’, you’ll need to have a really good read of the documentation. There’s a lot this option does, and may break many environments who aren’t ready for this – such as making sure you have no Legacy Authentication requirements, and that all users will register for MFA within 14 days or be blocked from sign-in until they register.
Although I can see this option being turned on by an uninformed administrator and causing some chaos, I like the idea of this. It means a new tenant can now have a single option to start with to implement several critical aspects to protect the tenant against attacks – right now there’s a lot you need to go through to lock it down, and especially for a small business who doesn’t have the time or resources to do this as well as a larger one, a single on/off switch solves a lot of security problems.
Security Defaults is also available to all customers on all tiers – Azure AD Free tier, which means those who have basic needs can now be protected in several ways they weren’t able to do via Conditional Access before.
Security Defaults isn’t listed as being in Preview as far as I can tell, so it may be an option that’s just rolled out and a ready to go. I am guessing there’ll be a bit of kickback around this being a single option that has no other configurable options in it, so we’ll have to wait and see if the product changes, or Microsoft’s vision of a security toggle stays as their goal.
Today I’m sharing Robert Crane‘s CIAOPS Academy service. He’s an Australian based Microsoft Office Servers and Services MVP, and seems to be rather busy with all his different projects, including the CIAOPS Need To Know podcast.
That podcast I highly recommend as an easy way to keep on on the latest Office 365 and Azure news. Even though I try to keep on top of it myself, they often raise other new features or changes that I hadn’t come across yet.
Beyond that though, the CIAOPS Academy is a service I personally pay for that Robert provides. I am on the lowest tier, but the private Facebook group that Robert runs is an invaluable source of fellow professionals who ask and help all things in the Microsoft tech space.
It’s different to other communities with it’s paywall, as everyone is invested and cares about the topics raised.
There’s also a referral program for signups – sure you can use my affiliate link to CIAOPS Academy or use one that doesn’t help me pay for my own access here. I’m not one to suggest services or products I don’t believe in myself, but I’ve had several questions raised already which has more than paid for the service in my mind.
The bronze level (which is what I use) is enough for me right now, but higher levels give you access to videos and other training materials.
The bonus news I can share here is that there is now a 7 day trial available, which is mentioned at the bottom of the patron page above. If you want to see what it’s about and check it’s worthwhile, you can now do it for free!
In summary, if you’re someone who is either new to, or currently managing Office 365 and Azure, this is a great group of people to be a part of. I’m not the only other Microsoft MVP there, which I think shows the value of this service.