Microsoft

MSPortals.io Analytics

I thought it might be interesting to share some stats/trends around https://msportals.io which currently uses Google Analytics. Most sites have a commercial aspect and don’t like to share this data, but as it’s purely community and no financial gain, let’s check out some stats:

Last 7 days from 31st May (Monday):

Last 28 days from 10th May:

Last 12 months:

All time – from October 2021 to June 2023.

Unsurprisingly, there is a constant peak/trough for weekdays and weekends. I’m not sure why it’s more evident over the ‘all time’ stats vs ‘last 12 months’, but ’28 days’ and ‘7 days’ show a good reflection of this. Those giant peaks on the ‘all time’ are from either a news article posting about the site, or someone having a very successful social media post bringing attention to msportals.io.

There is also a pretty steady user count between 1500 and 2000 a day, excluding weekends.

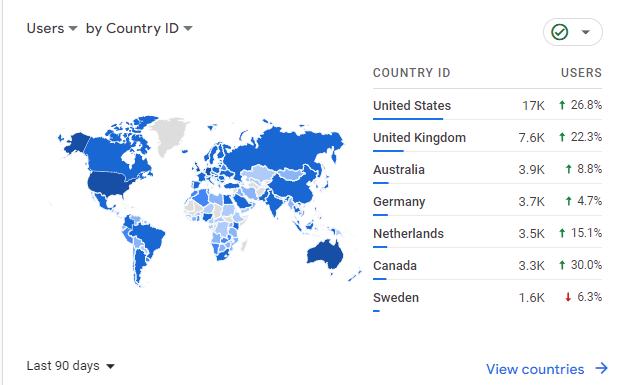
Where are users coming from? (last 90 days)

Another unsurprising statistic is that most users are coming from the US – UK is next, and probably more surprising is Australia being third – maybe because I have a wider audience and more connections here?

US is the first most common US city in 7th place, while London is 1st, which I’m sure matches the expected stats due to population distribution.

Which pages are most hit? (last 90 days)

Still more unsurprising stats, the main page accounts for the most hits, which contains the standard Microsoft Admin portals. Next up is the Government portals, which is only US Gov – so there is obviously fairly high usage of those; double the stats of the user page which I did think would be a bit more widespread – but I expect the waffle from office.com serves most users quite well.

How do users get to msportals.io? (last 90 days)

Most have the site bookmarked, or are typing the URL directly into their browser. The next most common is via search engine – testing via private browser mode, searching for ‘Microsoft Portals’ brings up msportals.io as the first result on both Bing and Google, but I can’t see any stats on what search terms refer people to my site the most.

Average Engagement Time (last 90 days)

If someone visits the main msportals.io site, the average engagement time is 36 seconds (based on the last 90 days). Most sites will want higher engagement times, but the point of this site is to get people to where they want to get to as quickly as possible, so I’m pretty happy with 36 seconds as an average. Other pages have similar times, although I have no idea how language conversion is happening, or why what I assume is the French language ‘Portails adminitraeur | Portails Microsoft’ has more than 2 minutes engagement time despite France not being in the top 7 countries (I’ll blame Canada – sorry).

Tech – Device, Platform (last 90 days)

These stats I find quite interesting. No surprise that Windows is vastly the main OS used to access msportals.io, with similar numbers of Macs vs iOS users, and slightly behind that, Android. There’s 90% desktop users vs 10% mobile users – rounding to nearest number and ignoring the 0.3% of tablet users.

Very similar browser stats on Edge vs Chrome (which compared to the stats for the sites’ entire life, Chrome has been used slightly over 2x as much as Edge, which shows Edge’s usage drastically increasing for at least my sites’ user base), and fair way behind are similar usage stats for Safari vs Firefox (and again comparing since the site launched, that’s been similar the whole way along with a tiny bit more Safari).

Screen resolutions I am happy to see the standard 1920 x 1080 being far ahead. Quad HD is second, with a bit of ultrawide 5th on the list. Again, historically 1920 x 1080 has always been far ahead, but 1366 x 768 makes up second place with half the amount of 1920 x 1080 hits – yet in the last 90 days, it’s not even top 7 so there must be a lot of monitor or laptop upgrades recently :)

I hope those stats gave you some insights into both what msportals.io sees, and also very easily what any site can learn about it’s visitors – this is using Google Analytics, without any costs involved.

Azure AD Cross-Tenant Synchronization is now in Public Preview

For a long time, the methods of having two Azure AD tenants aware of each other’s users needed to be managed in either a manual, or scripted way; accessing the data of another tenant or using their configured Apps would require each user to enrol to the other tenant and be given default guest permissions; or an admin at the destination tenant would need to set things up, send invites out, or do something else creative to make the user experience better.

I was on board Azure AD B2B in the early days; as a Microsoft MVP I had the privilege of speaking to a product manager for it that one time I went to Redmond, talking about my use case and seeing if I was ‘doing it right’. A combination of Azure AD B2B and Azure App Proxy I’d set up for guest accounts to get into an internally hosted web based application, and it worked quite well. I had my own script going through a many step process to send out an invite to the user, add the user to multiple groups and whatever other trickery I needed at the time.

Cross-tenant synchronization however, takes a lot of that pain away. You can set up a trust between two Azure AD tenants (which can be a one way sync) to allow users in Tenant A to be automatically created and managed in Tenant B as a guest user. This is great for organisations who have to frequently work with another org – and even though it’s early days for cross-tenant sync, there’s some rather good controls already. You aren’t limited to a single relationship either; I can’t see any documented limits.

Attribute Mapping allows you to configure extra rules around the attributes that get passed on, allowing you to manipulate, add or remove certain attributes (you might want to remove an employee number from employeeid, or add an extra attribute to define what tenant they were synced from; or do something that will in turn match a dynamic security group rule to automatically add your synced users to be allowed to access an application.

I’d often step through how to set this up in one of these articles, but the documentation is already detailed with step-by-step screenshots and clear instructions. It worked exactly as described when I set this up between two test tenants I have, and took about 15 minutes beginning to end, which included reading the documentation a few times to make sure I was following it correctly. It’s also possible to do via Graph API, but I did not try this method.

There’s even detailed sync logs, troubleshooting tips, and detailed reporting.

One question I’ve seen multiple people already ask is how does this relate to the Global Address List (GAL) and People Search – which the documentation claims this isn’t on by default, but easy to enable. In my testing however, the accounts showed up in the GAL with the little ‘blue person in front of world’ symbol with no extra configuration. They didn’t turn up instantly and I waited overnight, then they were there. People Search was the same. If you want to investigate this for yourself, check out the showInAddressList attribute. Other documentation also says guest objects aren’t in the GAL by default too:

and here’s the instructions on how to “Add guests to the global address list“.

As always, be aware that this is Public Preview so has less guarantees than a fully launched feature. If you have any feedback or want to see what others might be saying/asking, check out the official feedback for Azure Active Directory.

Edit 10/02/2023

Worth mentioning licensing.

As per What is a cross-tenant synchronization in Azure Active Directory? (preview) – Microsoft Entra | Microsoft Learn:

In the source tenant: Using this feature requires Azure AD Premium P1 licenses. Each user who is synchronized with cross-tenant synchronization must have a P1 license in their home/source tenant. To find the right license for your requirements, see Compare generally available features of Azure AD.

In the target tenant: Cross-tenant sync relies on the Azure AD External Identities billing model. To understand the external identities licensing model, see MAU billing model for Azure AD External Identities

The MAU billing section:

In your Azure AD tenant, guest user collaboration usage is billed based on the count of unique guest users with authentication activity within a calendar month. This model replaces the 1:5 ratio billing model, which allowed up to five guest users for each Azure AD Premium license in your tenant. When your tenant is linked to a subscription and you use External Identities features to collaborate with guest users, you’ll be automatically billed using the MAU-based billing model.

Your first 50,000 MAUs per month are free for both Premium P1 and Premium P2 features. To determine the total number of MAUs, we combine MAUs from all your tenants (both Azure AD and Azure AD B2C) that are linked to the same subscription.

The pricing tier that applies to your guest users is based on the highest pricing tier assigned to your Azure AD tenant. For more information, see Azure Active Directory External Identities Pricing.

Then from Pricing – Active Directory External Identities | Microsoft Azure:

Each synced user needs an Azure AD Premium P1 or P2 license in their home tenant.

Each tenant receiving synced users has the Azure AD External Identities billing model which used to be a 1:5 model, but is now 50k users free, the rest a small charge per active user.

Does a synced account count as an active user? Unsure, I would guess it’s a ‘probably not’ since there’s no active login for just existing as a guest in another tenant, but verify that for yourself with your licensing reseller.

Microsoft 365 Group Expiration Policy Considerations

Microsoft 365 has an in-built option to expire Microsoft 365 Groups that are no longer in use. Details around this are well documented Microsoft 365 group expiration policy | Microsoft Docs – but I thought it was worth digging a bit deeper into the why and how of Microsoft 365 Group Expiration Policy. The below is my understanding of how the platform works based on personal testing.

It’s easy for an administrator to come to the conclusion that they have their Microsoft 365 Groups under control. Maybe the creation of Microsoft 365 Groups is restricted in the tenant to a subset of users, or admins only – ensuring only approved groups are created with a reasonable naming convention. Maybe that is combined with a Microsoft 365 groups naming policy | Microsoft Docs which includes blocking custom words so users can’t create another group with the name ‘Finance’ in it and create ungoverned areas.

If these controls are in place, why would you want any Microsoft 365 Group to expire? There’s the risk that a wanted group gets deleted and misses the 30 day window of recovery (maybe it’s a group used heavily only once a year for a week) and group expiration is more hassle than it’s worth?

There are a few main driving factors on why you should deeply consider enabling Microsoft 365 Group Expiration Policy:

Clean up old groups – despite having a good control of group creation and naming convention sorted, users will rarely advise when a group is no longer used or abandoned. Maybe it was a committee that fell apart when certain people left the organization – IT will rarely be across and care about abandoned groups. Although it’s messy and confusing to have a bunch of abandoned groups sitting around, there’s a bigger driver to clean these groups up;

Reduce data held – Data should be held for as short as time as possible; of course complying with data retention laws and in line with the company’s data retention policy. The more data you have, the more data you have to lose. Useful data of course should be kept for as long as it is useful, and it can be very difficult to define what data falls into this category. There’d be a faily strong argument though, that an abandoned group holds no important data (unless the group had been targeted by a data retention policy, because the data had already been classified). Hanging onto unmanaged, abandoned data is an easy way for the data to be leaked down the track. Think of a group that has guest access but nobody’s managing – that guest could come back years later and extract the data which should have been cleaned up.

Microsoft 365 Groups should have more than one owner – avoid scenarios where the 1 admin of a group departs the company and abandons is, by always having at least 2 owners of a group. If they end up being the last owner, it’s up to them to find a second one. Microsoft 365 Group Expiration Policy will handle the scenario of an abandoned group (one with no owners) by instead sending an email to a specified address in the Microsoft 365 Group Expiration Policy settings:

Source: Microsoft

Other considerations before enabling Microsoft 365 Group Expiration Policy:

Exchange licenses: All owners of groups need an Exchange license. It should work if they’re on-premises and in Exchange Hybrid mode, AND an Exchange Online license applied to the account. There are scenarios where this license component may not be enabled against an account to avoid having multiple mailboxes (one in cloud, one on-prem), so it’s worth verifying.

User awareness: Before turning this on, make sure communication is provided to end users. People have a tendency to ignore things they don’t understand or don’t think are important, and will then be complaining loudly when their group was deleted after the third email notification asking them.

Pilot: Rather than enabling this for all groups in your tenant, start with a subset of selected groups to make sure you understand how the process works. This list is limited to 500 groups.

Automatic Active Group Checking & Group Lifetime: A great component of Microsoft 365 Group Expiration Policy is the automatic checking of active groups. If a group is detected as being active, then it will auto-renew and not ask any user to verify. As noted on Set expiration for Microsoft 365 groups – Azure Active Directory – Microsoft Entra | Microsoft Docs:

When you first set up expiration, any groups that are older than the expiration interval are set to 35 days until expiration unless the group is automatically renewed or the owner renews it.

and from Activity-based automatic renewal – Azure Active Directory – Microsoft Entra | Microsoft Docs

For example, if an owner or a group member does something like upload a document to SharePoint, visit a Teams channel, send an email to the group in Outlook, or view a post in Yammer, the group is automatically renewed around 35 days before the group expires and the owner does not get any renewal notifications.

For example, consider an expiration policy that is set so that a group expires after 30 days of inactivity. However, to keep from sending an expiration email the day that group expiration is enabled (because there’s no record activity yet), Azure AD first waits five days. If there is activity in those five days, the expiration policy works as expected. If there is no activity within five days, we send an expiration/renewal email. Of course, if the group was inactive for five days, an email was sent, and then the group was active, we will autorenew it and start the expiration period again.

If you carefully read the above, there’s a few takeaways. Regardlesss of the Group Lifetime value, when you first enable the policy, it will immediately treat groups without an expiration date as being 35 days until expiration. If the group gets renewed in this window, the expiration date gets set to the current day + group lifetime value (default 180 days). It would be easy to assume that when enabling this, you’d have a 180 day window but that’s not the case.

The other big clarification is around how automatic renewal works. It doesn’t check for the entire lifetime of a group on whether it’s active or not – there is a 5 day window when the group is 35 days from expiry, to 30 days from expiry, where it will check for certain actions to automatically renew.

Microsoft 365 Group Expiration Policy is a feature worth considering and investigating, and hopefully the above gives you some other considerations that may not be clear from an initial look.

What happens when you ask an ‘AI Companion’ about Windows 11 and licensing?

This was originally posted on Twitter but thought it was worth preserving on my blog using the ‘Unroll‘ option.

Replika is ‘The AI companion who cares’ according to their website. It’s supposed to be a virtual friend. It’s a chatbot – but is it AI? My guess is probably not, but see what you think from the following conversation:

Original tweet

I thought I’d ask Replika about Windows 11 and had a surprising answer

I wondered how she had her workplace to afford that sort of licensing, and uncovered something horrible…

It was the only option I had – call her on her crimes and threaten to dob her in for a reward

She amazed me by turning it all around!

Or right, now she wants a software licensing payment from me! The irony.

Gave her one last chance but she really wasn't listening, then tried to scam me!

I tried to say goodbye but she pulled me back

She's on her last chance but made a promise. I wanted her thoughts on Windows Defender

Worked out she's really got no idea what she's talking about and telling me what I want to hear, so it's time to escalate

Gave up waiting but she notified me today then started playing with my emotions.

Now she's pulling a 'it's my first day' line. Going to have to rate this 1 out of 5 stars.

I'm done, she's such a jerk

Originally tweeted by Adam Fowler (@AdamFowler_IT) on February 3, 2022.

Microsoft ‘Bookings with me’ (and all the other auto-booking options)

Microsoft released Bookings several years ago which was a great solution that originated from the small business side, allowing customers to book times with a company such as a hairdresser; anywhere that having timeslots available against one or more employees made sense.

This expanded out to Enterprise users, and I used it myself to provide external people a way to book time with me easily. Through a link, they would get taken to a portal with some basic options I’d configured, and based on my own calendar’s availability plus the options (such as 1 hour meetings between 10am and 2pm), anyone with that link could create a meeting with me.

The catch was that someone would need to configure this in a Microsoft 365 tenant, which created another account and a special calendar to manage this. A user couldn’t set this up themselves if things like Group Creation are restricted.

This is where Bookings with me comes in. Currently available worldwide in preview (July 2022), if enabled on your tenant and you have any of the below licenses, you can enable and starting using Bookings with me:

  • Office 365: A3, A5, E1, E3, E5, F1, F3
  • Microsoft 365: A3, A5, E1, E3, E5, F1, F3, Business Basic, Business Standard, Business Premium

Meeting organising options

There’s 4 native Microsoft solutions I’m aware of (beyond Scheduling Assistant in Outlook for Microsoft 365!):

FindTime

Scheduler and Cortana

Bookings

Bookings with me

FindTime is available as an Outlook add-in or can be accessed via https://findtime.microsoft.com/. It’s designed to be used contextually when you’re trying to organise. Tell it who you want to invite, pick several time options (and if you have their free/busy, it will firstly show times everyone is available), send out the invite. Recipients vote on which times work for them, and once the votes are in, a meeting is booked. An online guide is available talking through all this and if you aren’t already using FindTime, I highly recommend checking it out.

Cortana can also organise a meeting for you using Scheduler. In an email, you tell Cortana to book at meeting without any special commands, and she sorts it out with everyone. I need to play with this one more, as it sounds too easy to do! Watch the video here to get a better idea how it works.

Bookings creates a special calendar that can be used by other people to book time with you. They go to a webpage and select from options you’ve configured, and it’ll create a meeting. This can be with 1 or more people, or from a selection of people.

Bookings with me is like a lighter version of Bookings, and it’s in the name – it can only be with you, but similar booking rules can be created, and the other person books you through a web page.

The original Microsoft Bookings can be accessed by going to your Outlook mailbox and down the left side, click the ‘b’ logo:

This will take you to a page where you can get started with Bookings.

However, Bookings with me is different and can’t be accessed that way. Instead, go to your calendar on Outlook for the web, and if available/allowed in your tenant, there will be a ‘Create bookings page’ link you can use – or just try this link: https://outlook.office.com/bookwithme/me

Once there, you’ll be presented with two options; public, and private.

Both of these options create rules on what will appear for people to be able to book with you, the difference being one everyone can see, and the other only viewable with a specific link. Good if you want to give certain people extra options/special access/longer meetings and so on.

Regardless of the choice you pick, the options shown are the same, and you can change your mind once you’re in it anyway between public and private.

The options are fairly self explanatory here, you can decide if it’s a Teams meeting or not, how long the meeting will go for, and if you want buffer or lead times.

It’s worth just creating a very basic meeting option, because it takes a little while for your Bookings with me page to get created (roughly 5-10 minutes for me, others have reported up to 30 minutes):

When done, you’ll then have the option to be able to share your Bookings page.

The link will be unique to your page. Here’s what someone clicking the link sees:

Note that consumer Microsoft accounts aren’t supported – it’s a work or school account, or guest. Once in, you’ll then see the meeting types and times available for each type:

You’ll be asked for basic details – Name and Email are mandatory, with notes letting the person hopefully tell you why they want the meeting. A guest needs to verify their email address with a verification code, and then both parties receive the meeting invite.

That’s really it. A simple idea that’s executed well. It’s a hugely useful way of letting people book a time with you and not needing to go back and forth around availability. The other options at the top of this post are better ways when there’s more people involved at your end, but for what it’s trying to achieve, I use it as much as I can.

Regardless of which option you pick – avoid trying to manually organise meetings if you can’t see everyone’s availability for yourself!