Internet Of Things

Internet Of Things Light Up Challenge – Part Four

Read Part One Here
Read Part Two Here
Read Part Three Here

Part three ended the day before the competition – to find out if my device lit up in a way meaning I won one of 5 Xbox Ones…

I’d set up a webcam at home, and called myself via Skype to see if the flashing light changed:

Luckily, around noon the light changed to green only – which meant I was a winner! Microsoft confirmed, and hopefully my Xbox One will be on it’s way soon.

What was the point of all this (apart from winning an Xbox One)?

If you know what you’re doing with web services on Azure, some Visual Studio programming and a bit of basic electronics – you can easily build a device that reports back on something. It’s what the ‘Internet of Things’ is all about – low powered, simple devices that tell you a bit of information. It might be the temperature of your hydroponics setup (I don’t know why I thought of that first), or it could be an alert when your dog is barking too loud (that one’s because of the next door neighbour’s dog).

We’re only in the early days of cheaper, easier ways to do this – it’s been possible for a long time, but the missing piece of the puzzle was cheap redundant infrastructure with great up-time, which is what Azure, AWS etc are now providing. It’s more of an ‘Out of the box’ experience to set up the infrastructure to do it, which makes it more accessible to everyone.

Since I’m a winner, I’m going to make someone else a winner too. My Netduino kit is up for grabs – check it out in Part One (you’ll also get the NeoPixel Ring that was originally missing). I’ll take it apart and mail it to someone, and you can do with it as you please. I’d love to see a photo of a finished project – you can follow the same project I did and see how you go.

To win it, just comment on this post with 25 words or less: What’s your Internet Of Things idea? You don’t have to be able to make it, just tell me what you’d want. The best answer decided by me (factors are if it’s feasable, amusing, or just something I’d want myself). Make sure you use your email address so I can contact you – email won’t be used for anything else. I’ll mail this around the world too, pending Australia Post being able to deliver to your country.

You have until the end of the month of April, 2015 to respond!

Edit: Just to note, the kit’s worth about $100 total :)

Internet Of Things Light Up Challenge – Part Three

Read Part One Here
Read Part Two Here

Read Part Four Here

Have a read of the last two parts to catch up on what’s happened up to here.

The NeoPixel Ring arrived in the mail which meant I could continue onto Lab 6. Since I was ahead of the lab I was supposed to be up to, I had to do some digging around to work out how to wire the thing up. Now there’s some much clearer doco, but I managed to get the wires right the first time!

WP_20150327_18_02_49_Pro

It may not be the most elegant of wiring, but it worked just by bending a few wires. What would happen when I updated the Visual Studio code and pushed it to the device?

Blinding lights. It was configured to just play several pretty patterns – still cool though!

WP_20150327_12_13_04_Pro

I tried to take some photos, but just believe me, this thing is bright. At this stage, I now had to sit tight and wait for further instructions.

*A week passes*

A few days ago, another email came in. I had to update the code from GitHub, in preparation for the competition. After mucking about and getting it going again, I re-uploaded the source code to the Netduino. Now, the device was both flashing lights via the NeoPixel Ring, as well as reporting temperature and light readings back to Azure. I took a quick video of the new light sequence:

A much more basic light sequence. I now have to leave it running, as some devices will soon flash a special sequence. If that happens, it means I’ve won an Xbox One!

Judging by how many devices are live in the dashboard, there’s about 30 people on so far. I don’t know how many people are involved, but there are five Xbox Ones are being given away according to the T&C’s – it seems like my odds are pretty reasonable.

I may have to set up a webcam at home so I can keep an eye on the lights, as they’ll change at lunchtime. Will I win an Xbox One? We’ll find out soon! I’ll wrap up soon with the results and re-cover what the point of this whole exercise was.

Internet Of Things Light Up Challenge – Part Two

Read Part One Here

Read Part Three Here
Read Part Four Here

Details of this project are on GitHub here where you can get the parts and do this yourself.

I eagerly took the items home and started following the Internet Of Things Maker Den Instructions to make my device.

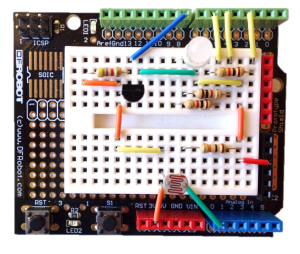
Lab 1 was to get all the wires, resistors, the LED, temperature sensor and photocell all connected up on the breadboard. It was a bit bewildering to see a pack of 500 resistors, but only a few were actually used:

WP_20150307_11_22_28_Pro

After finding and extracting the resistors I needed, I was supposed to build this:

proper iot 2

Here is my finished result. Can you spot the mistake I made?

WP_20150307_11_31_33_Pro

Took me a while to find it, but that was Lab 1 complete.

WP_20150309_23_09_56_Pro (1)

Lab 2 (called Blinky) was a bit more of a challenge, since I don’t use Visual Studio. I was stuck on this for a while until Microsoft’s Dave Glover (Twitter @dglover) answered my tweets of desperation. My issue ended up being a configuration issue in Visual Studio where I was deploying to an emulator rather than USB (this device connects via micro-usb for both power and data). After that was changed, my code successfully deployed to the Netduino, resulting in a red flashing LED:

WP_20150310_22_29_23_Pro

Awesome! Since it’s a multi-coloured LED, I could change the code to make it blue:

WP_20150310_22_43_28_Pro

Or green:

WP_20150310_22_42_26_ProThe party’s over now, onto the next lab.

Lab 3 was just about seeing the temperature and light sensor work, piping back values to Visual Studio. Nothing exciting to screenshot here, it all just worked perfectly.

Lab 4 was changing the code again, but this time downloading a dashboard that would visually show the two values of light and temperature. The device had to have a network cable plugged in, so it would send it’s data to Azure, and the dashboard then showing the values off of Azure. Here’s my two gauges:

Untitled


Lab 5 was just adding a bit of extra code to uniquely identify the device, in preperation for Lab 6.

Lab 6 requires a NeoPixel Ring, Grid or Strip which I don’t have yet – it’s in the mail. That will be covered in Part Three.


Internet Of Things Light Up Challenge – Part One

Read Part Two Here
Read Part Three Here
Read Part Four Here

Frankie Moore from La La Ninja has decided to run an ‘Internet Of Things Light Up Challenge‘ which I signed up for (Sorry, signups are closed now!).

The challenge is about building an internet enabled device using an open source electronics platform, which runs the .NET Micro Framework to build ‘something’. In this case, my understanding is that it’ll be a device that can light up – if it lights up, you win an Xbox One!

I have very little programming knowledge, so this is a great entry level project for me. Over several weeks we’ll be given tutorial videos to follow so we can build this device. I just need to install a copy of Visual Studio 2013 and I’ll be ready to go.

A few days ago, the package for this project turned up. I had no idea what to expect, but this is what was in the box:

WP_20150303_11_33_06_Pro

WP_20150303_11_47_14_Pro

Not what I was expecting! A bunch of resistors (500 of them!), some boards, wires… and the best bit, a Netduino Plus 2. Specs of this cool little computer are available here, but here’s the basics:

CPU: STMicro 32-bit 168MHz
RAM: 100+ KB
Code Storage: 384 KB
Ports: 10mb Ethernet, MicroSD, MicroUSB

I’ll post more as the project continues, and I’m really looking forward to it!