Read Part Three Here
Read Part Four Here
Details of this project are on GitHub here where you can get the parts and do this yourself.
I eagerly took the items home and started following the Internet Of Things Maker Den Instructions to make my device.
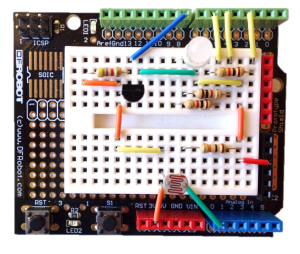
Lab 1 was to get all the wires, resistors, the LED, temperature sensor and photocell all connected up on the breadboard. It was a bit bewildering to see a pack of 500 resistors, but only a few were actually used:
After finding and extracting the resistors I needed, I was supposed to build this:
Here is my finished result. Can you spot the mistake I made?
Took me a while to find it, but that was Lab 1 complete.
Lab 2 (called Blinky) was a bit more of a challenge, since I don’t use Visual Studio. I was stuck on this for a while until Microsoft’s Dave Glover (Twitter @dglover) answered my tweets of desperation. My issue ended up being a configuration issue in Visual Studio where I was deploying to an emulator rather than USB (this device connects via micro-usb for both power and data). After that was changed, my code successfully deployed to the Netduino, resulting in a red flashing LED:
Awesome! Since it’s a multi-coloured LED, I could change the code to make it blue:
Or green:
 The party’s over now, onto the next lab.
Lab 3 was just about seeing the temperature and light sensor work, piping back values to Visual Studio. Nothing exciting to screenshot here, it all just worked perfectly.
Lab 4 was changing the code again, but this time downloading a dashboard that would visually show the two values of light and temperature. The device had to have a network cable plugged in, so it would send it’s data to Azure, and the dashboard then showing the values off of Azure. Here’s my two gauges:
Lab 5 was just adding a bit of extra code to uniquely identify the device, in preperation for Lab 6.
Lab 6 requires a NeoPixel Ring, Grid or Strip which I don’t have yet – it’s in the mail. That will be covered in Part Three.


3 thoughts on “Internet Of Things Light Up Challenge – Part Two”